Now Reading: How to Make a DIY Emergency Signal Flag
-
01
How to Make a DIY Emergency Signal Flag

How to Make a DIY Emergency Signal Flag
Picture this: you find yourself stranded in the wilderness, a remote island, or lost in the vastness of the great outdoors. Panic sets in as you realize that help may not arrive for hours, or even days. In dire situations like these, having a way to signal for rescue is not just a comforting thought, but a potential lifeline. Enter the DIY emergency signal flag—a simple yet effective tool that can make a world of difference in getting you the help you desperately need. In this article, we will guide you through the process of creating your own makeshift signal flag, ensuring that you are well-prepared for any unforeseen circumstances that life throws your way. So, grab your supplies and let’s embark on this creative and empowering journey of survival.
Table of Contents
- Choosing the Right Materials for Your DIY Emergency Signal Flag
- Step-by-Step Guide to Designing Your Emergency Signal Flag
- Tips for Making Your DIY Emergency Signal Flag Highly Visible
- How to Properly Attach and Use Your DIY Emergency Signal Flag
- Key Safety Precautions to Consider When Using a DIY Emergency Signal Flag
- Q&A
- In Retrospect
Choosing the Right Materials for Your DIY Emergency Signal Flag
When it comes to creating your own emergency signal flag, selecting the right materials is essential to ensure its effectiveness and durability. Here are a few key factors to consider:
- Visibility: Opt for brightly colored fabrics that stand out in any environment. Fluorescent or neon materials, such as blaze orange or lime green, are highly recommended for their visibility even in low light conditions.
- Weather resistance: Since emergency situations often arise unexpectedly, it’s crucial to choose materials that can withstand various weather conditions. Look for durable fabrics like ripstop nylon or waterproof polyester that are capable of withstanding rain, wind, and intense sunlight without fading or tearing.
- Size and portability: Consider the size and weight of your DIY signal flag, especially if you might need to carry it for long distances. Opt for lightweight materials that can easily fold or roll up, making it easier to pack and transport during emergencies.
- Reflective elements: To enhance visibility during nighttime or low light situations, incorporating reflective strips or panels on your flag can greatly increase its effectiveness. This ensures that your distress signal can be noticed by rescuers or passing vehicles even in the dark.
By carefully selecting the materials for your DIY emergency signal flag, you can create a reliable and effective means of communication during critical situations. Remember to test your flag in different conditions to ensure its functionality before relying on it during an emergency.
Step-by-Step Guide to Designing Your Emergency Signal Flag
Ready to design a custom emergency signal flag? Follow these easy steps to create a unique flag that will catch the attention of rescuers during emergencies. Remember, these flags are crucial in situations where communication is obstructed or limited, so design it thoughtfully and with high visibility in mind.
Step 1: Choose a vibrant color
The first step in designing your emergency signal flag is to choose a color that will stand out in various environments. Opt for vibrant colors such as bright orange, neon yellow, or vivid red. These bold colors have a high contrast with natural backgrounds, improving the flag’s visibility from a distance.
Step 2: Select a recognizable symbol
Next, select a recognizable symbol to display on your flag. Choose something simple, like an exclamation mark or a bold arrow, which can be universally understood even in stressful situations. Remember, the symbol should be easy to identify even from a distance and in low light conditions.
Step 3: Incorporate reflective materials
To enhance visibility during nighttime or low visibility scenarios, incorporate reflective materials into your emergency signal flag design. Attach strips or patches of reflective fabric to ensure your flag can be easily spotted by searchlights or flashlights. This additional shine will significantly increase the effectiveness of your flag as a distress signal.
By following these simple steps, you can create an eye-catching emergency signal flag that increases your chances of getting rescued swiftly during critical situations. Remember to familiarize yourself with international distress signals and regulations to ensure your flag complies with standards. Stay safe and be prepared!
Tips for Making Your DIY Emergency Signal Flag Highly Visible
When you find yourself in an emergency situation, having a highly visible signal flag can be a lifesaver. It helps rescuers spot you from a distance and increases your chances of being found quickly. Here are some creative tips to make your DIY emergency signal flag stand out:
- Choose vibrant colors: Opt for colors that are bright and eye-catching like fluorescent orange, lime green, or neon yellow. These hues are easily visible from a distance and attract attention.
- Add reflective strips: Incorporate reflective strips on your flag to enhance visibility during low-light conditions. The glimmering effect will catch the light and make your signal flag more noticeable.
- Use bold patterns: Consider adding bold patterns or designs to your flag, such as large alternating stripes or a chevron pattern. These high-contrast designs increase visibility, even from a distance.
- Include signal symbols: To make your flag easily recognizable as a distress signal, consider including universally recognized signal symbols, such as a large letter “S” for distress or internationally recognized SOS symbols.
- Ensure a generous size: Make sure your flag is large enough to be easily seen from afar. A size of 3 x 5 feet or larger is recommended to maximize visibility.
Remember, the goal is to create a flag that is impossible to ignore. By incorporating vibrant colors, reflective strips, bold patterns, signal symbols, and a generous size, you can increase the chances of being located during an emergency. Stay safe and be proactive in preparing for any unforeseen situations!
How to Properly Attach and Use Your DIY Emergency Signal Flag
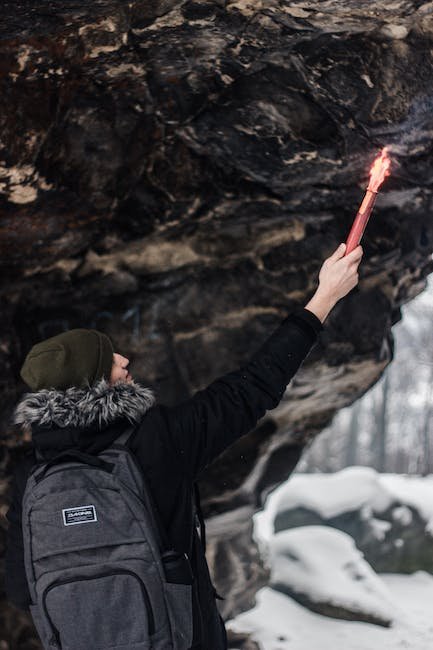
Creating a DIY emergency signal flag is a crucial step towards ensuring your safety in dire situations. Once you have crafted your flag, it is essential to know the correct way to attach and employ it. Follow these steps to properly attach and use your DIY emergency signal flag:
1. Find a sturdy and visible location: Choose a spot where your flag can be easily seen by search and rescue teams or passing airplanes. An open area, preferably on high ground, is ideal for maximum visibility.
2. Secure the flagpole: Attach the flagpole to a sturdy base, such as a tree branch or a long pole stuck firmly into the ground. Make sure it is stable and will not easily tip over or detach during harsh weather conditions.
3. Raise and secure the flag: Firmly attach the flag to the top of the flagpole, ensuring it is securely fastened and won’t come loose. If using fabric, tie the corners tightly around the pole or use strong clips or bands to secure it. This will prevent your emergency signal flag from being blown away.
4. Use bold and contrasting colors: Opt for colors such as bright orange, neon yellow, or vibrant red to create a stark contrast against the environment, increasing its visibility from a distance.
5. Add reflective materials: Enhance the effectiveness of your signal flag by adding reflective tape or patches. This will increase its visibility during nighttime or in conditions with low light.
6. Follow the signal code: Familiarize yourself with internationally recognized emergency signals and codes. Displaying a signal flag alone might not convey the message accurately. Complement it with additional means of signaling, such as whistle blasts or flag movements, to ensure you are effectively communicating your distress.
Remember, a well-attached and correctly used DIY emergency signal flag increases your chances of being spotted and rescued swiftly during an emergency situation. Stay calm, vigilant, and confident in your preparedness.
Key Safety Precautions to Consider When Using a DIY Emergency Signal Flag
When it comes to creating your own emergency signal flag, safety should always be your top priority. While it may seem like a simple task, there are a few important precautions that you should keep in mind to ensure your signals are effective and safe for both yourself and potential rescuers.
- Material Selection: Begin by choosing the right fabric for your flag. Opt for bright colors such as fluorescent orange or neon yellow that stand out even from a distance. Ensure the fabric is lightweight to allow for easy waving. Avoid materials that easily tear or deteriorate in wet conditions.
- Size and Visibility: The size of your flag is crucial for maximizing visibility. Generally, a flag around 2.5 feet by 3.5 feet (approximately 75 cm by 105 cm) is considered effective. Attach reflective tape to enhance visibility during low-light conditions. Always check if the flag is visible against different backgrounds and weather conditions.
- Secure Attachment: Properly securing your emergency signal flag is essential to prevent it from becoming loose or detached. Be sure to sew or tie the flag securely to a sturdy pole or stick. Double-check the fastening to ensure it can withstand strong winds without compromising its effectiveness.
- Signal Understanding: Familiarize yourself with well-known emergency signals and their meanings. By using recognized signals, you can increase the chances of your distress call being understood by potential rescuers. Research commonly used signal codes and gestures to maximize the effectiveness of your flag.
By taking these key safety precautions into consideration, you can confidently create and use your DIY emergency signal flag, knowing that you have prioritized safety without compromising its effectiveness. Remember, in times of emergency, clear communication and visibility are paramount to receiving the help you need.
Q&A
Q: How to Make a DIY Emergency Signal Flag?
A: Making a DIY emergency signal flag is a simple and creative project that can come in handy in various situations. All you need is a piece of brightly colored fabric, a stick or pole, and basic sewing skills.
Q: What type of fabric should I use for my emergency signal flag?
A: Choose a bright-colored fabric like fluorescent orange, yellow, or red that can easily be spotted from a distance. Nylon or polyester fabrics are durable and weather-resistant options for your flag.
Q: How large should the emergency signal flag be?
A: The size of your emergency signal flag depends on the visibility needed and the materials you have available. A flag that measures approximately 2 feet by 3 feet is a good starting point, but adjust the size as per your preference.
Q: Can I repurpose an old bedsheet or t-shirt for the flag?
A: Absolutely! Repurposing old materials like bedsheets or t-shirts is a great way to create a DIY emergency signal flag without spending extra money. Just ensure that the fabric is brightly colored and in good condition to ensure optimal visibility.
Q: What tools do I need to make an emergency signal flag?
A: To make your DIY emergency signal flag, you’ll need a sewing machine or needle and thread, scissors, and a sturdy stick or pole that is about five feet long.
Q: Can I hand-sew the flag if I don’t have a sewing machine?
A: Yes, you can certainly hand-sew the emergency signal flag if you don’t have access to a sewing machine. It may take a bit longer, but with patience and basic sewing skills, you can achieve the desired result.
Q: How do I attach the flag to the stick or pole?
A: To attach the emergency signal flag to the stick or pole, fold the top edge of the fabric over the stick and sew it in place securely. Alternatively, you can use strong adhesive or zip ties to fasten the fabric to the stick.
Q: Where is the best place to store my DIY emergency signal flag?
A: Find a secure and easily accessible location to store your emergency signal flag. A backpack, glove compartment, or a designated emergency kit are all suitable options. Ensure it is readily available in case of an emergency.
Q: How should I use the emergency signal flag?
A: In an emergency situation, hold the flag by the stick or pole and wave it vigorously to attract attention. Make sure to wave the flag high above your head to increase visibility and signal distress or the need for assistance.
In Retrospect
In a world filled with uncertainty, it’s crucial to be prepared for any situation that might come our way. And when it comes to emergencies, having a DIY solution on hand can make all the difference. We hope this article has guided you through the process of creating your very own emergency signal flag, a beacon of hope amidst chaos.
Remember, this homemade flag is not just a piece of fabric; it’s a symbol of resilience and resourcefulness. It represents your ability to adapt and overcome in the face of adversity. So, whether you find yourself stranded on a remote island or lost in the wilderness, this humble flag will be your voice in the silence, guiding rescuers towards your location.
By using simple materials and following the step-by-step instructions provided, you’ve now armed yourself with a powerful tool that could potentially save lives. Imagine the sense of relief and reassurance that you and your loved ones will experience knowing that you have an effective means of communication during a crisis.
But let’s not forget, crafting an emergency signal flag is just the beginning. It’s essential to remain calm, stay focused, and continue seeking assistance until help arrives. Remember, your newfound DIY creation is more than just vibrant colors on fabric; it’s a lifeline that demands patience and perseverance.
As you embark on your journey, don’t keep this knowledge to yourself. Share it with your friends, family, and even strangers. Teach them the art of creating an emergency signal flag, so they too can be prepared for the unexpected. Together, we can build a network of resilience, ensuring that no one ever feels alone in times of distress.
So, go forth and let your creativity soar, as you fashion your unique emergency signal flag, ready to wave it high when the situation calls. Stay safe, stay prepared, and may this DIY endeavor be the beacon of hope that guides you through the darkest hours.
As an affiliate, my content may feature links to products I personally use and recommend. By taking action, like subscribing or making a purchase, you’ll be supporting my work and fueling my taco cravings at the same time. Win-win, right?
Want to read more? Check out our Affiliate Disclosure page.